How to stop the Hikvision Beeping Noise! Hard Drive Fault
Here is a YouTube video, to help show you how to diagnose and hopefully fix a HDD Exception Error and stop the recorder from making the beep beep beep noise!
A sudden beeping sound from your security systems recorder is an immediate warning message that something requires attention. This normally occurs in a sequence of five sharp beeps to grab your attention. The most common cause is an internal hard drive running abnormally or experiencing a complete hardware fault. On your mobile app and on the recorder this issue often presents itself as an HDD error, HDD Exception Error or Disk Exception error.

Checking For A HDD Error And Testing The Playback
This page can help you run through some basic diagnostics to see if we can fix the problem. A clear sign that the hard drive is failing involves your playback availability. You might still see a perfect live view on the Hik-Connect app but remain completely unable to play back past events and recorded footage. Every DVR or NVR contains an internal drive with moving parts spinning continuously to ensure constant recording. Because these parts run constantly they will eventually wear out over time.
Testing the CCTV Power Supply Unit
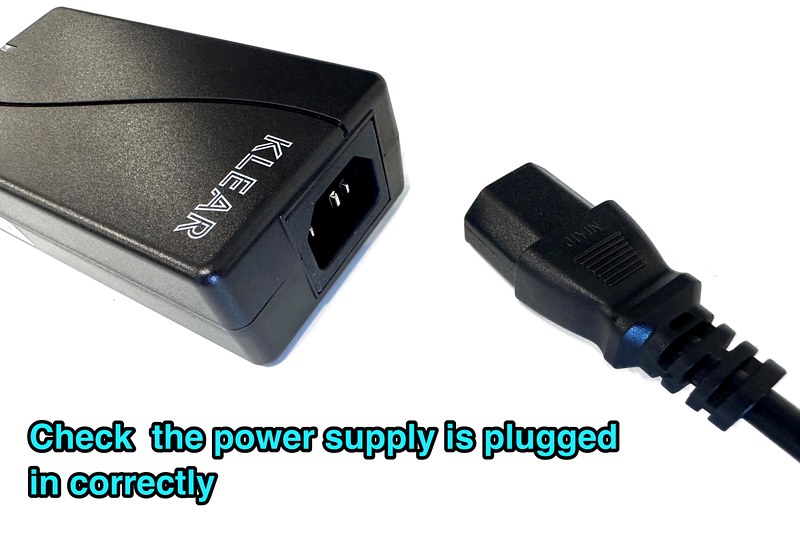
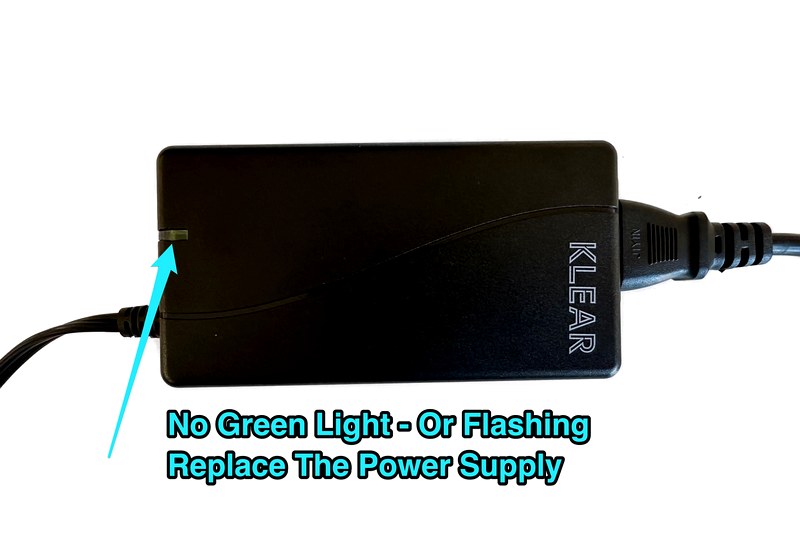
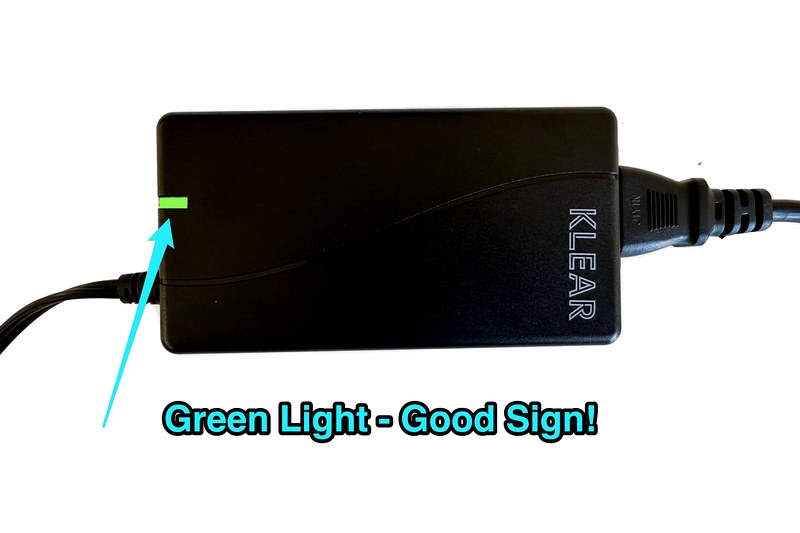
We always recommend checking the main power supply unit first before opening up any hardware. If the power transformer is failing and cannot deliver the correct voltage it will cause a knock-on effect where the hard drive cannot spin up properly. Make sure the kettle lead is firmly pushed into the transformer brick and the end is fully inserted into the back of the recorder. Many of our standard power packs feature a solid green light. If this light is completely dead or flashing it means the power supply is faulty and needs replacing.
Repairing and Initialising the Hard Drive
To inspect the storage settings directly you need to plug a monitor or TV into the recorder using an HDMI or VGA cable.

Navigate through the main menu to find the System or Configuration screen then select the “storage device” option. Highlight your listed hard drive and select the repair option to check the index database. This specific process can fix file glitches. Beware that although unlikely this option can run the risk Navigate through the main menu to find the System or Configuration screen then select the “storage device” option. Highlight your listed hard drive and select the repair option to check the index database. This specific process can fix file glitches. Beware that although unlikely this option can run the risk of deleting the files.
If the error remains you can select the “INIT” option to completely initialise the drive. This action completely formats the storage to build a fresh file system but it will delete all existing footage so ensure you back up anything important first.

Inspecting Internal Cables and Connections
If software fixes fail you should turn off the power and open the metal casing using a Philips screwdriver. Remove the black casing screws from the rear and sides to access the internal components. Inside you will find two critical leads connecting the hard drive directly to the main board. The SATA data cable is usually bright red or blue in colour and handles data transfer to the main system board.

The secondary cable consists of four small wires that supply essential power. Unplug both ends of these cables and plug them back in firmly to ensure a solid connection. Faulty cables are rare but our CCTV engineers occasionally find that replacing them entirely solves the issue.
Confirming a Successful System Repair
Once everything is reassembled and powered back on you can easily verify if the fault is resolved. The most obvious sign of success is that the irritating beeping sound will stop completely. Look closely at the top right corner of each camera channel on your screen for a red clipboard icon indicating active recording. You can also return to the storage device menu to confirm the status reads as normal or R/W which indicates active read and write capability.
The Best Order to Check and Fix a HDD Exception Error
| 1) Re-boot The Recorder | Either to go the power settings on the recorder using a TV or monitor and reboot. If that’s not possible, switch the power off at the mains, leave for 30 seconds and then switch back on again. |
|---|---|
| 2) Power Supply Connection | Make sure the power supply is plugged in correctly. Check to see if you have a solid light or if it’s flashing. Swap the power supply for a new one. |
| 3) DVR Settings | Connect a TV or a monitor to the DVR / NVR via a HDMI or VGA cable. Go to the storage device and select “Repair Database” |
| 4) Initialise Hard Drive | Go to storage device. Select “INIT” with will wipe the memory and reset the hard drive. |
| 5) Check Hard Drive Cables |
Switch off the recorder and remove the power, either by unplugging it or switching it off at the mains. Remove the black screws from both sides and the rear of the recorder, then slide the lid off. Inside the recorder, unplug and reconnect the SATA data lead, usually blue or red, and the hard drive power lead, which has black, red and yellow wires. Do this at both ends, where the leads connect to the hard drive and where they connect to the recorder. Once reconnected, replace the lid, tighten the screws and power the recorder back on. |
| 6) Replace Hard Drive Cables | Try replacing the hard drive cables. |
| 7) Call Zone CCTV | If this still hasn’t worked, call us on 01138800134. We can book in an engineer and we can quote to replace the hard drive and recorder if necessary. If you are out of Yorkshire – we could potentially recommend you to another installer. |
We find that working through the HDD error in this order is the best approach.
By checking everything systematically, we can make sure all possible causes are covered and hopefully fix the issue without you having to spend unnecessary money on a new hard drive or recorder.
Still not working ? We can help! Engineer Call Out
If you have tried all these troubleshooting steps and the recorder continues to beep it is highly likely the drive has failed completely or there is a fault with the DVR / NVR. Depending on the age of your security systems it might be the ideal time to upgrade the entire recorder to future-proof your CCTV security system. CCTV technology moves quickly, with cameras and DVR/NVR recorders regularly improving and offering new features such as better image quality, smarter search options, remote viewing and improved reliability.
Zone CCTV is an approved Hikvision partner based in Leeds with over fifteen years of experience handling installations across Yorkshire. Our experienced CCTV engineers provide reliable repair and replacement services to get your home security working perfectly again.
If we can’t cover your area, we may know a recommended installer we could put you in touch with.
#Hikvisionbeeping #stopcctvbeeping #harddriverepair #cctvharddrive #HikvisionRepair #CCTVTroubleshooting #SecuritySystems #CCTVEngineers #cctvrepairs